Router Lab
In the winter term 2024/25 I had the opportunity to participate in the Router Lab, organized by the Max Planck Institute for Informatics in Saarbrücken, Germany. The Router Lab was all about getting hands on experience on industry-ready network equipment and setting up our own Autonomous System (AS).
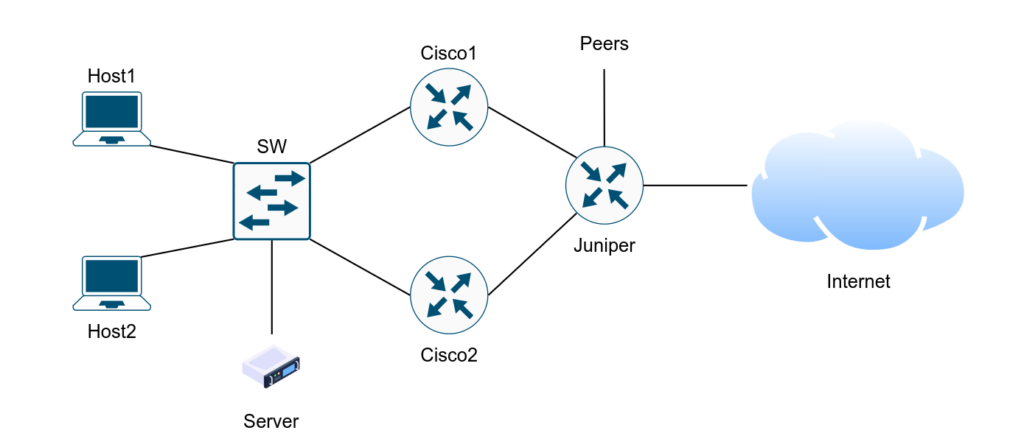
Within the two weeks we worked our way towards the final network topology that looked like this:
The lab was done by teams of two in which we received new tasks on a daily basis, eventually leading us to our own functional AS connected to the Internet, hosting a web server, a DNS Nameserver , and more.
Day 1 / basic setup
On day 1 we started by physically connecting our two routers to each other as well as to our hosts. After resetting and familiarizing with them, we started to create three subnets. One between the routers and one for each of the connection between the hosts and the routers. Furthermore, we added static routes to both of the routers, allowing our hosts to ping each other. Note that almost everything we did, we did for both, ipv4 and v6.
Day 2 / vLans, VRRP and DHCP
Day 2 was about introducing a switch inbetween the Routers and the host, connecting all devices directly to the switch. With this setup we played around with vlans, effectively creating the same virtual topology as the one we had on day 1. After getting this to work, we got rid of the vlans again and proceeded to configure both Cisco to use the Virtual Router Redundancy Protocol (VRRP). That is, both routers are integrated into one virtual router, creating redundancy. Furthermore we configured the routers to assign IP addresses to new hosts dynamically with DHCP.
Day 3 / juniper router, OSPF
On day 3 we added the juniper router to our topology, getting closer to our final one from above. Note that setting up the juniper router as well as the Cisco routers also included setting up ssh-access, disable password based authentication and making sure things are as secure as they should be before connecting them to the internet in the upcoming days. Additionally we configured all three Routers to use OSPF to announce routes to each other. At this point, the cisco routers announced all hosts within their network to the juniper and the juniper announced itself as the default route (0.0.0.0) to the ciscos.
Day 4 / Creating IRR objects, AS peering and BGP
On the fourth day we were asked to create objects for our AS in an Internet Routing Registry (IRR). That is, we specified Person, Organization, Maintainer-Object, ipv4-, ipv6-addresses as well as the AS number. Of course the ip address spaces as well as AS numbers were already prepared by the Router Lab team. We then connected our juniper router to two AS’s managed by the MPI and configured BGP to announce our routes to them as well as receiving the global set of routes from the internet. After that, we were able to connect to the internet from our hosts as well as ping our hosts from the internet! Pretty cool!
Day 5 / more time to clear up things
Day 5 was a day without new task. We used it to finalize our setup, remove any configuration bugs, make sure everything is secure and working. At this point we could already observe permanent vulnerability scans towards our network.
Day 6 / direct peering, NTP, BGP access control, Linux Server
On day 6 we were asked to peer with two additional AS’s from our fellow Router Lab members. That is , we connected our juniper routers directly and setup a new BGP session advertising routes to our network directly. We continued by setting up NTP, basic BGP access control, exploring our network using Nmap and connecting a Linux server to our network.
Day 7 / DNS Nameserver, simple Nginx webserver
We used the new linux server in our network to setup an authoritative name server for a domain that was previously registered and given to us. We choose to use bind9 as DNS server. For a domain to be added to the DNS system, two authoritative servers are needed per domain. Thus, we peered with other teams, each having their DNS server working as a primary nameserver for their own domain and as a seconday nameserver for the domain of the other team. After setting up the zones and reverse zones, we were able to reach our internal hosts not only via ip-addresses but also directly by using our domain. For the domain to have some targets, we also setup a simple nginx webserver representing our goup.
Day 8 / RPKI and ROV
To secure our route advertisement against route hijacking, we created a Route Origin Authorization object that states that our owned IP prefixes should only be originating from our AS. This makes sure, that hijacking routes gets way harder. On the other side, our border Router should also only accept routes that either do not have a Route Origin Authorization object at all, or those that have a correctly verified origin. We used our linux server to run Routinator. Routinator is a software that is used to verify the RPKI data, to keep the heavy lifting away from the router. The verified information are subsequently submitted to the juniper router, which performs the Route Origin Validation to decide which routes to accept.
Day 9 / Reverse DNS, SNMP
On day 9 we finished the setup of the reverse DNS for our domain. Furthermore we configured the routers and our server to use the Simple Network Management Protocol which allows our server to remotely read and set configuration parameter of the routers.
Day 10 / Visualize SNMP data
Finally, on day 10, we used docker to setup a prometheus time series database, fed it with information retrieved via SNMP, and created graphics and statistics with Grafana. It was interesting to see how much traffic is constantly coming towards our network. Probably a lot of internet wide vulnerability scanning.